This is part 2 of the blog post about automating MikroTik configuration. In part 1 I wrote about:
- why I automate my router configuration;
- how to connect to the router through a terminal;
- how to set up a static IP, subnet mask, and a gateway;
- how to set up security profiles and assign them to wi-fi networks;
- how to add NAT rules pointing to a machine in the local network;
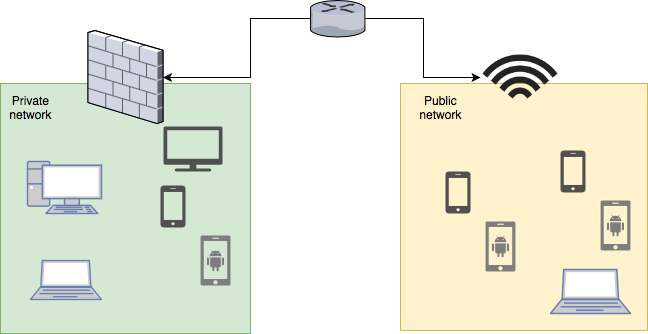
In this blog post, I’ll cover separating the networks into one for guests with access only to the Internet and another with access to the local network (TVs, phones, laptops, etc.).
I want to have a strong random generated long password for my machines and short easy one for guests. This is easy, but when both networks have the same access there’s no much sense in the strong password if there’s network with a weak one and same permissions.
That’s why I want to create one Virtual LAN (VLAN) in another network with another DHCP server for guests and block it’s access to the rest.

First I defined a new bridge for the guest network. The bridge allows hosts from different networks to connect. In my case I want the WAN port to connect to VLAN network.
/interface bridge add name=bridge-guestVLAN is a way to represent a network without the need for physical separation. For my configuration, I need to set interface, name, and id. All interfaces are using id 1 by default, but I always keep some gaps between ids and orders just in case I need to add another in between.
/interface vlan add interface=wlan1 name=vlan-guest vlan-id=10Since I want separate network I need to configure second DHCP server. The demo is using 192.168.2.0/24 network and assumes the main network is using 192.168.1.0/24.
DHCP configuration needs two things:
- IP pool defining the range of IPs available to be assigned to the hosts;
- DHCP Server assigned to an interface and using a defined pool;
In my case the interface is the bridge.
/ip pool add name=dhcp_guest ranges=192.168.2.2-192.168.2.254
/ip dhcp-server add address-pool=dhcp_guest disabled=no interface=bridge-guest name=dhcp-vlan-guest
Now it’s time to add the WLAN interface into the guest bridge:
/interface bridge port add bridge=bridge-guest interface=vlan-guestSince I want to have a virtual network I need to assign an IP to the bridge so the bridge can act as a gateway.
/ip address add address=192.168.2.1/24 interface=bridge-guest network=192.168.2.0The DHCP server has a pool already, but for a working network, I need to specify the bridge as a gateway:
/ip dhcp-server network add address=192.168.2.0/24 gateway=192.168.2.1Now the hosts connected to the main network will receive IPs in the 192.168.1.0/24 network and the hosts connected to the guest network will receive IPs from 192.168.2.0/24 network. This is great, but the hosts in the two networks are still accessible from each other and I want to stop that with firewall rule:
/ip firewall filter add action=drop chain=forward in-interface=bridge-guest out-interface=bridgeThe goal is achieved. I have automated configuration and router setup takes only a few seconds. I added everything in a script with placeholders in my GitHub account.
For easy execution, a I wrote simple node.js script for replacing the placeholders with values from JSON file I keep stored in private repo and cloned in ~/.config/dotfiles.
const fs = require('fs');
let arg = process.argv[2];

const config = require(`${process.env.HOME}/.config/dotfiles/config.json`)

var data = fs.readFileSync(`./${arg}`,"utf8");
console.log(eval('`'+data+'`'))
The complete (at least for the router part) config.json looks like this:
{
    "mikrotik": {
        "webfig_port": 81,
        "mac_address": "AA-BB-CC-DD-EE-FF",
        "ip_address": "111.111.111.111",
        "subnet_mask": 26,
        "wan_interface": "ether1",
        "gateway": "111.111.111.111",
        "dns_servers": "1.1.1.1,8.8.8.8",
        "nat_destination_ip": "192.168.88.2",
        "tcp_nat": [22, 80, 443],
        "udp_nat": [1194],
        "default_username": "admin",
        "default_ip": "192.168.88.1",
        "main_wifi": {
            "ssid": "SECURED NETWORK",
            "security_profile": "secured-profile",
            "password": "abcd...(kidding,should-be-more-secure)"
        },
        "guest_wifi": {
            "ssid": "GUEST NETWORK",
            "security_profile": "guest",
            "password": "kittens"
        },
        "guest_vlan": {
            "id": 10,
            "name": "vlan-guest"
        },
        "bridge_guest": {
            "name": "bridge-guest"
        },
        "dhcp_guest": {
            "name": "dhcp_guest",
            "network": "192.168.2.0",
            "subnet_mask": 24,
            "gateway": "192.168.2.1",
            "dhcp_range": "192.168.2.2-192.168.2.254",
            "server_name": "dhcp-vlan-guest"
        },
        "dhcp_static": [
            {
                "ip": "192.168.1.2",
                "mac": "BB:CC:DD:EE:FF:GG",
                "comment": "nuc"
            }
        ]
    }
}
Now I simply run:
node replacer.js router_configuration | bash